Run Ghost CMS for free on your Windows PC
Explore our comprehensive guide on setting up Ghost CMS on your Windows machine. Learn how to install Ghost locally, step by step, enabling you to test the waters or start developing Ghost themes with ease.
Many individuals inquire in forums or on social networks about Ghost CMS, and at first glance, it may seem that Ghost is exclusively accessible through Ghost (Pro) hosting for a fee. However, this is a misconception. Ghost is open source, allowing anyone to install and run it locally or on their own servers for free or at the cost of hosting. In this tutorial, we will demonstrate how to seamlessly install Ghost on your local Windows 11 machine. This guide is particularly beneficial for those looking to test the waters and explore how the CMS (Content Management System) operates, or for developers eager to begin crafting Ghost themes.
What do we need?
- Download & Install NodeJS (Javascript Runtime, Ghost is written in Javascript)
- Install Ghost globally in system via Command line (Don't worry, it's easy 🤓)
- Create a Project Folder and Install the Ghost Instance inside
1. Step - Download NodeJS runtime
Begin by opening your preferred browser and navigating to Google. Simply search for 'NodeJS', and you'll find the official website listed among the top results.
2. Step - Install NodeJS
Now locate the NodeJS installer within your 'Downloads' folder. The installer file will have a ".msi" extension. Double-click on the installer to open the installation window. The installation process is straightforward—simply click 'Next,' 'Next,' and 'Next' to complete the installation.
3. Step - Open command prompt and install Ghost globally
Open the system command line. Click on the search button in your Windows panel and type 'cmd'. One of the initial results should be the Command Prompt. Open it, and now let's ensure we have all the essential programs in our system. We need to check for the presence of 'node' and 'npm'. NodeJS serves as the necessary Javascript runtime, and 'npm' is the package manager for the NodeJS ecosystem.
Test if we have "npm" by this command it should return version number:
npm -v
Test if we have "node" by this command it should return version number:
node -v
Now, we can proceed to install Ghost globally using the npm package manager. Run the following command and exercise patience as it may take some time:
npm install ghost-cli@latest -g
4. Step - Install Ghost locally in folder
Next, we'll create the project folder where our Ghost instance will reside. While you can install Ghost directly in any folder, for this tutorial, we'll navigate to the "\Documents" folder and create a folder named "my_ghost". We'll then proceed to install Ghost within this folder. The entire process may take some time; in the video below, we've significantly sped up the installation for demonstration purposes.
Navigate into "\Documents" using "cd" command:
cd Documents
Create a New Folder in the '\Documents' Directory and name it 'my_ghost'. Feel free to choose a name of your preference. We will use "mkdir" command to create new folder from command prompt:
mkdir my_ghost
Now inside our project folder run this command to install Ghost in folder:
ghost install local
As depicted in the video below, the installation process may require some time. Your Windows firewall might prompt you to allow network communication. Additionally, during the installation process, you may encounter another command window with 'node.exe' in the title. Feel free to close this window, as demonstrated in the video.
5. Step - Start Ghost
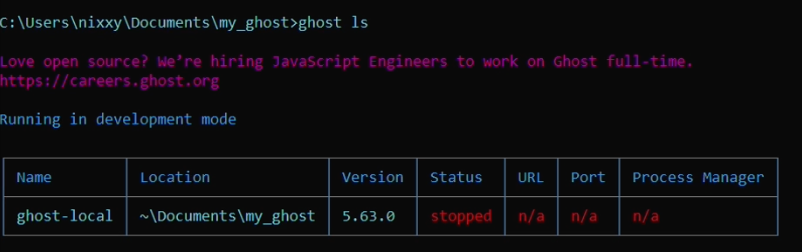
Within our folder where Ghost is installed, we can use a few commands to manage our instance. One of these commands is 'ghost ls' which displays information about the instance within our folder. If you closed the 'node.exe' window in the previous step, you should observe that our instance is either not running or it is currently stopped.
ghost ls
Once you confirm that your instance is stopped, you can easily start it using the following command:
ghost start
Now, after Ghost has successfully booted up, you can verify the status of our instance once again using the command ghost ls. You should see 'running (development)'. Next, we'll need to copy the URL of our running instance. In most cases, it will be http://localhost:2368/. Simply copy this URL from your terminal and paste it into your preferred browser's URL bar. Hit 'Enter,' and you should be directed to a form where you can fill in the necessary information for your new Ghost instance.
In this tutorial, we debunked the misconception that Ghost CMS is only accessible through paid Ghost (Pro) hosting. We highlighted the fact that Ghost is an open-source platform, allowing you to run it locally or on your own servers or computer for free. We covered each step, from downloading and installing NodeJS to starting your Ghost instance. Whether you're looking to test the waters of content management systems or dive into Ghost theme development, this guide has equipped you with the knowledge to get started.
If you have any questions, encounter challenges during the installation, or have specific development needs, we're here to assist you every step of the way. Don't hesitate to reach out and contact us. Your success with Ghost CMS is our priority. Happy building and creating with Ghost!